
When you fellows were just little blighters, I think a week never went by without me making some version of a chocolate cake. I tried all sorts. And I was never really satisfied. When I came upon a cake that I thought "finally - this is the one", the next time I had a go it was never as good as the first. I was such a fusspot. Pa always preferred the moister ones and quite frankly so did I.
Sometime when Pa began his business in the year 1999 I made a chocolate cake that I was delighted with. I held my breath as I made one for the second time. Low and behold, it was just as good. I thought "I fluked it". So I made another and as they say the rest is history. I have never deviated from "my" recipe and it pretty much always turns out soft and moist and delicious. It's reliable and trusty and I am very proud that all those years of experimenting and tweaking and altering the recipe finally paid off.
And so my darla's, it seems fitting that I begin our series of recipes with a mission that caused me much angst. It shows that determination and persistence does eventually pay off. The funny thing is that after all those years of making very average chocolate cakes, I never once said "I give up". I plugged on and I always believed that one day I will find it. I guess the lesson is, if you truly believe something is worth doing, keep doing it and it will eventually happen.
The surprising thing with this cake, is that it becomes even more moist the next day. Truly. I can't tell you how moist it is after day two because there has never been any left by day three. Sometimes it didn't even make it to day two. But I never minded. It brought me heaps of joy to see you lot and Pa of course, eating and savouring every single piece.
Ma's Famous Chocolate Cake
200gm preferably 'unsalted' butter however 'salted' butter is fine
400gm caster sugar
4 tablespoons cocoa powder
360mls hot water
1 level teaspoon bicarb of soda
1 generous teaspoon of vanilla extract (optional)
4 lightly beaten eggs
320gm sifted self-raising flour
Chocolate Icing
25gm unsalted butter
125gm sifted icing sugar
1 level tablespoon cocoa powder
2 or 3 or 4 teaspoons of milk, it varies every time
Take out your trusty kitchen scales and measure out the sugar.

Cut and measure your butter

Cube the butter; place the butter and the sugar into a saucepan

Sift the cocoa into a bowl. You get rid of all the lumpy bits this way.

Take a small whisk and beat the cocoa and hot water together. You need hot water to help the cocoa to dissolve.

Put the dissolved cocoa into the saucepan with the butter and sugar. Mix well.

Have the bicarb of soda on standby ready to add when needed.

Melt this mixture over a low heat; stir frequently so that it becomes totally amalgamated. We want the sugar to be totally dissolved.

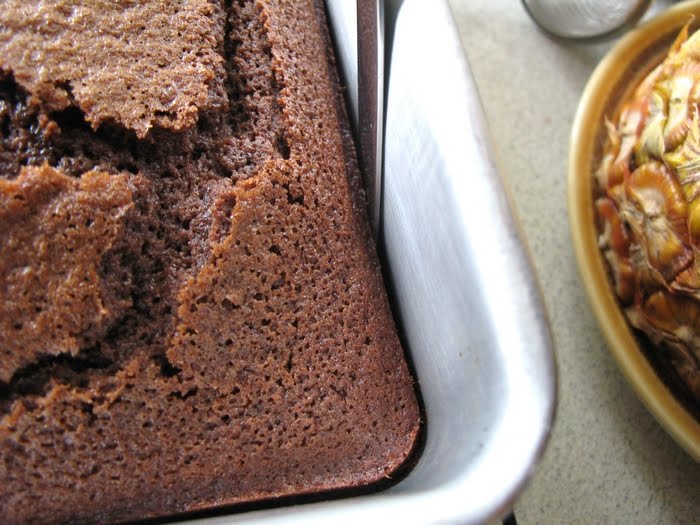
Your mixture should resemble the picture below; a nice thick chocolate liquid, with the sugar dissolved and quite hot but not boiling if you can help it. It shouldn't hurt if it does boil, but remove from the heat if it is bubbling too much. This stage should only take about five minutes depending on your hotplate.

When you see the liquid in the centre begin to bubble a few times, you need to work quickly. Add the bicarb of soda; mix vigorously to incorporate into the mixture. You will see it rise and froth very quickly. It is important to take off the hotplate before it rises to the top of the saucepan as it may spill over the sides. It hasn't happened to me yet; but almost.

Pour all the mixture into a stainless steel or ceramic or glass bowl. No plastic bowl please!! Use your spatula to get all the mixture into the bowl. Don't do an Ian Huey please and leave half the contents behind. You know how I hate that kind of waste. Besides it will affect the end result.

Set your bowl aside; cover with a teatowel. Sit your bowl onto of a baking rack. This helps the air to circulate underneath and it will cool down faster.

Work on getting the other components ready now. Have your beautiful free range eggs ready. Your eggs "must" be room temperature; not cold from the fridge. This is such an important part in lots of baking. If the eggs are cold; then you can place them in a warm water bath to help take the edge off the cold. Not hot water or else you will par boil them! Its a tricky business which is why it is best to take the eggs out first thing in the morning.

To get your baking tin ready; you must grease and line the tin with baking paper. This will ensure that your cake will come out easily. Tear off a length of paper. Go easy. Waste as little as possible. This stuff is quite pricey but it is good practice to only use what you need anyhow.

Place your baking tin over the paper. Use a pencil to draw a line right around the bottom of the tin.

Cut this out and you now have a perfect fit to lay over the bottom of the tin. Use some butter to grease your baking tin to help the paper stick. Place into the tin; use your hand to even out the paper working from the centre and pushing into the corners.

You should turn on your stove to preheat the oven at about this stage. I always begin the oven at about 170degrees celcius and then turn it down to 160 or even 150 when I put the cake in to bake. Measure out your flour. As you can see below I had too much, so adjust appropriately.

So many cooking shows or cooking books tell us not to worry about sifting flour anymore. Don't you believe it! You would be mortified my dears, to see how often there are 'greebies' in the flour. By sifting you not only remove unwanted creatures, you also ensure that there are no lumps in the flour. And sifting once is not enough. Using two stainless steel bowls, sift the flour back and forth for about three or four times. If you can do this from a height, even better. Your flour will be really light and airy, however watch out that you don't lose sprinkles of flour over the edge of the bowl. You would be surprised how many times I am sifting, when a lovely breeze coming through my kitchen window decides to blow away my sifting flour! Oh dear. One must be on their guard at all times!

Use real vanilla extract if you can afford it. Vanilla essence is imitation stuff after all and it really is a case of you get what you pay for when it comes to 'vanilla'.

After your chocolate mixture has cooled, you shall notice that a skin has developed. That is fine. Put in a teaspoon of vanilla extract and stir it through the mixture.

Using just a fork, beat your eggs well. Do this in a separate bowl before adding to the chocolate.

Pour the beaten eggs into the chocolate.

Use your spatula to mix well.

Pour half of the chocolate mixture into the flour; use your spatula to bind all the ingredients.

Swap over and using your whisk, give the mixture a thorough but short beating. Don't mix for too long because this is what makes a cake tough.

Now pour this back into the remaining chocolate mixture and using a light hand stir through till it is well combined.

Your mixture will look quite runny with lots of bubbles in it. This is normal. Be concerned if the mixture is too thick because it will be no where near as moist. Remember. Runny is good.

Pour the mixture into your prepared baking tin.

Carefully bash the tin a couple of times on the bench to get rid of some of the bubbles, but it doesn't really matter. Be careful if you do this though, because you might find some of the 'runny' mixture escaping the tin.

Make sure you scrape out every bit of mixture! You know how I hate waste.

Place the cake into the preheating oven and check after 40 minutes. All I do is press my finger right into the centre of the cake. It is does not spring back or still looks gluggy then add another 10 minutes baking; check again. It's not unusual for this cake to bake for up to an hour because oven temperatures can vary so much. Besides, this is a big cake.

Another thing to look for the cake coming away from the sides. This is also a good indicator that your cake is cooked. Put your cooked cake onto a baking rack and keep your cake in the tin for at least five minutes but no longer than ten.

Run a flat knife all around the edges of the cake to ensure that it will not stick to the sides when it is turned out. Place the baking rack over the top of the tin; invert the cake; carefully lift the tin over the inverted cake.
Carefully peel away the baking paper.

Place another baking rack over the cake. I do this because if the cake has a high rise in the centre, then it will tend to crack in the middle underneath when you invert it. Also, the rack protects the cake from any lint on the tea towel when you cover it.

Cover the cake with a clean tea towel and allow to cool before icing the top.

When the cake is sufficiently cooled down, prepare the icing. Measure the icing sugar.

Icing sugar can really get lumpy, moreso than flour, so you really MUST sift the icing sugar. Once is enough; just get rid of any lumps because otherwise they will come through in the final result.

Sift the cocoa into the icing sugar. Mix the two ingredients well.

Measure the butter.

Place the cut up butter into the icing sugar and cocoa mix. Make sure you put this into a glass or pyrex bowl that can tolerate heat.

Place the bowl over a neat fitting saucepan that is quarter filled with water.

Upturn your cake either onto a serving plate or on the rack. It must be in a position to receive the icing once the icing is ready.

Add two teaspoons of milk to the icing; bring the water to boil; then reduce to a simmer. Make sure you are mixing the icing the whole time. It will be quite stiff at this stage which is normal.

We want the butter to melt and we also may need to add more milk to help reach the correct icing consistency.

When your icing has come together is still quite runny, it is ready. Take off the heat and you will notice before long that if you move the spoon 'creases' will appear in the icing. This means that you need to work quickly because the icing will take very little time to set. I leave it on the heat right up until I am about to pour it over the cake.

Working quickly, take the bowl off the saucepan, give the underside a wipe with a sponge so that you don't have any droplets of water run onto the cake and you may also need a cloth to hold if you find the bowl too hot to handle. It really isn't a big deal for me, but you guys might find the heat a bother. Pour the icing all at once into the centre of the cake. Take a long knife and spread the icing around the cake as quickly as you can. No joke. This icing sets very quickly. If it runs down the side, then relax. It is nice and rustic; don't worry about perfection. It ain't worth it. Oh, you must also have any sprinkles you intend to use ready and waiting and sprinkled almost immediately. They simply will not stick otherwise and will simply run off the sides. Trust me, I know!

Voila! Our cake is ready! You need to make it a couple of times to get the hang of it, but that's okay. Practice makes perfect. Oh and another thing, if you don't want your cake this big, the ingredients are easily halved. Keep the icing recipe the same though. This cooking lesson has been most laborious; I hope you guys have been paying attention because when I am in the old people's home I will expect you to surprise me from time to time with our family's favourite chocolate cake!
Baked with love from Mama. xxx
Awww. Ma. :) I'll definitely be referring to this post whenever I go to bake a chocolate cake... everytime!
ReplyDeleteNicka.
I hope so boogoos. I have just about posted and pictured every single step of the way, so you have no excuses.
ReplyDeleteHappy belated birthday two days ago! A teenager no longer, but knowing you I think you shall be forever young at heart!
Love Ma
...I think I may have found your new blog site. I'm looking forward to your tasty recipes - including the chocolate cake
ReplyDeleteHello there Athena. This blog is basically a record of our family recipes so that the kids can easily access them if and when they feeling like cooking. You are most welcome to check them out yourself. Thanks for visiting.
ReplyDeleteMariana.
Mariana! I just saw your recent and previous posts on thru my kitchen window...i was a little frantic how to get to you ...LOL...thnak god I got here.. hope you read this though...I know what you mean about getting rid of the comments and finding little meaning in food blogging...often ive felt that way too....but then I go back..But If I had a gorgeous farm like you i wld probably do as you have done...bloggin takes too much time...but journaling is fulfilling! so Ill look forward to reading what your up to dera Mariana.
ReplyDeletebtw Huggssss to you for mentioning me! we certainly have bonded and are like long lost friends...keep that kitchen table!
oh just to let you know. our eldest son Nik will be getting married december next year...Im busy preparing (mostly in my head) what to do...I have been off the blog for a while too..but got back today. (AGAIN)...heheh...sometimes I just want to do something else too!
Oh and congratulations to your wonderful and clever son Mitch!! what an achiever! I feel your pride ...every bit of it..Children are so wonderful...what wld we do without them!?
take care Mariana dearest....ill be visiting often. :)))